So my deadline for the 18th century cat costume isn't until Tuesday and i finished my costume on Wednesday. So I have had a bit of free time the last few days and yesterday I decided to start some work on the Marie Antoinette dress. I have cut out the fabric for the sleeves but haven't put them together yet and I have bought some chiffon type fabric that i am considering doing the ruffles in, but i am not 100% sure i like this chiffon. Its quite blue... not quite the right shade. I will do a few samples and see how i feel.
I have lost a bit of weight recently and as a result i am smaller than my mannequin now so the costume doesnt fit properly. From the looks of this, its not my waist that the weights come off unfortunately...
The back pleats and skirt, the skirt is currently waay to long
Close up on the en fourreau pleats and skirt pleats. Those loose threads need cutting...
I hope to make the sleeves this afternoon and play around with the chiffon so who knows, i may have another update for you soon :)
Sunday, 31 March 2013
Thursday, 21 March 2013
18th Century cat costume
So the rest of the costume that goes with the wig is starting to take shape. For this costume we were given only 4 weeks to make the toile and the real thing (at the same time as an essay and other context deadlines) so as you can imagine its been pretty hectic. We have until tuesday the 4th, so i am 2 weeks in and already finished the toile and quite well on the real thing so i think it will all be fine :).JPG)
The back has a pleated peplum that i have just spent all day embroidering along the border of with a trailing flower design that i drew out myself..JPG)
The Front of the Bodice has a diamond opening design, and underneath is a dip dyed chemise. Worn over a pair of panniers and a pair of breeches, which you can just see at the bottom. The breeches are made of an embroidered cotton.
The wig reaches down to below the peplum. Uunderneath the pleats of the peplum is a laced up corset, the lacing is then covered with the en fourreau back is done up with an invisible zip down the centre seam.
Detailed photographs will be taken on my good camera with the costume on the model rather than a mannequin once it has been fully completed. These ones were just taken on my friends i phone so they arent great quality
Rachael
xxx
Sunday, 3 March 2013
Making an 18th century 'cat' wig...
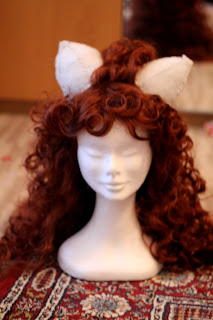
So for our next project, 'School for Scandal', we have to make one of the costumes and we only have 4 weeks to do it! That includes the toile and the real thing. In my design interpretation of the play i made all the characters have animal characteristics; the character that I have chosen to make is Lady Teazle who i have made into a cat. The wig on this character is the main feature, which i decided to make first to get it done and not have to worry about it anymore.
I started with the longest curliest wig that i could find in an auburn colour and bought two of them so that i could then use the second one to add length.
I made to frames out of thick milenary wire in the shape of cat ears, then covered it in a thin layer of wadding.
I put both of the structures on the top of the wig and sewed them down in the position that they looked best.
Bringing strands of hair from all around the structure i wrapped it round the ears and then arranged it on the top in a hopefully aesthetic way.
At the back I curled the different sections in circular sections and pinned them in place and then hand sewed all around the ears and curls so that they were all securely fastened onto the frame.
For the braid i cut apart the second wig so that i had three strands of extra length and then glued and hand sewed them to three strands of the original wig. Once they were all attached together I braided it all together into one long braid. Unfortunately the part where the second wig was attached is thicker that the rest which i am not entirely happy with, but i don't think there's anything i can do about it. Hopefully it doesn't look too bad?
Theres still some finishing touches to make, bows and ribbons to add and some smoothing down to do. The Wig is slightly frizzy in places with the hairs sticking up a bit, does anyone have any tips how to keep wigs in good condition and smooth down static and stray hairs? I have tried hairspray but it doesnt seem to work on the synthetic wig. Any tips would be great :)
xxx
Subscribe to:
Posts
(
Atom
)


.JPG)


